Showing posts with label DIY. Show all posts

Monday, August 3, 2015

Rainy Days DIY

I don't know about you, but where I'm at it's been pretty rainy lately. Rainy days can either be cozy or kind of dull and dreary. Here's a couple things I've done while stuck inside.


First off, I made red velvet cake bon bons. 
They are so tasty and very easy to make. (And great with your cozy coffee!)

Step one: Bake a red velvet cake. 
You can do this from scratch, but I just used a box mix. Let the cake cool. 

Step two: Crumble up that cake and mix in some cream cheese icing until it gets to a good consistency for forming bon bons. 

Step three: Roll little balls with the cake/icing mixture and place on a cookie sheet. Refrigerate until firm. 

Step four: Melt some semi sweet chocolate chips in the microwave and spoon some chocolate on top of your bon bons. Refrigerate again. 

Step five: Enjoy your delicious treat with a cup of coffee and a good book. 
~~~~~~

Recently, AC Moore had a sale on Lion Brand Landscapes yarn. I have marveled at this yarn every time I go into a craft store, but it was just too pricey for me. This yarn is so soft and shiny and comes in gorgeous vivid colors. I bought an armful of "Boardwalk" and decided to make a giant rainbow shawl. 


I love granny squares, so I'm making a half square for the shawl pattern. It's so much fun to watch the colors change and it works up pretty quickly. (If only the temperature outside would change faster as well!) 

Here's the pattern for the half granny square from: rensfibreart.wordpress.com

It's so easy once you get going. And using a colorful yarn is sure to brighten up anyone's rainy day!

That's all for now, thanks for stopping by! 

~Victoria 

Wednesday, July 8, 2015

DIY: Sea Salt & Rosemary Farmer's Cheese


Feel like you grew up on a farm with five ingredients! This cheese is so easy to make, you won't believe it!

Monday, July 6, 2015

aDiML: Fresh Blackberry Syrup & Crunchy French Toast

I apologize for the lack of posts lately. Life can get pretty crazy sometimes. :)
But I want to share some delicious recipes and fun moments with you. So, I know this blog gives off a glitzy, flashy vibe but I also love love love homemade farm fresh kind of things!

(totes a country gal!)

Monday, June 8, 2015

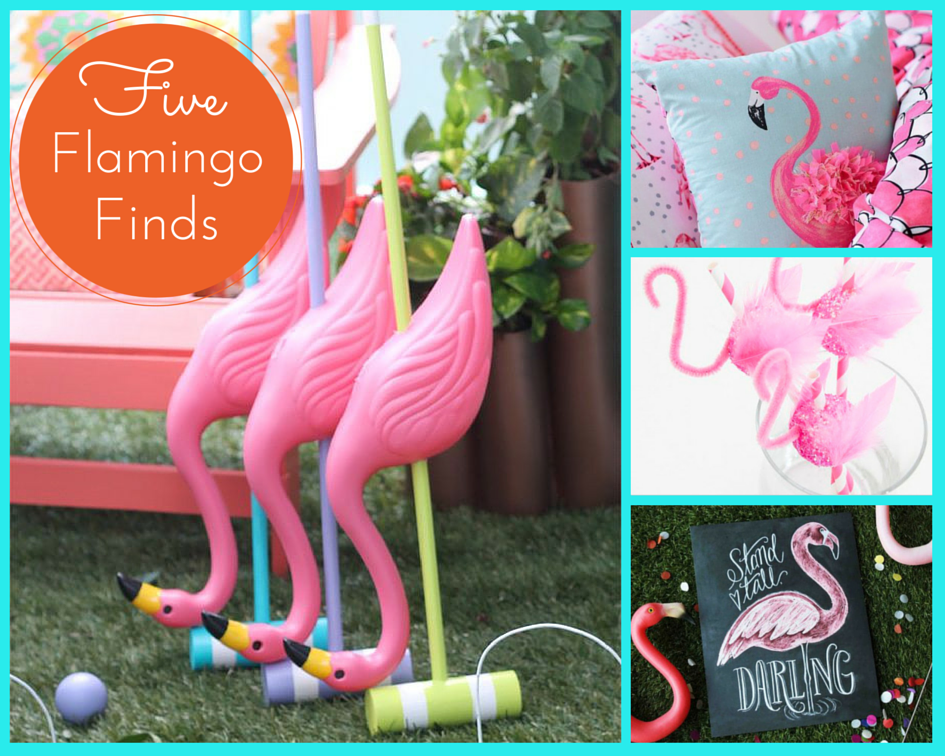
Five Flamingo Finds (Including a DIY!)


Hey there followers! Summer is in full swing so today's post features one of summer's most kitschy, iconic birds... The flamingo! If you're wanting a little Wonderland in your life, make your own Alice in Wonderland croquet set! Or make these adorable flamingo straws to sip lemonade by the pool! And if you just need a little more pink in your life, check out this fluffy throw pillow and chalkboard-inspired art!
But if you prefer to make something a little more personalized, follow this tutorial for DIY hand-print flamingo wall art! 

Sunday, May 31, 2015

Polyvore Inspired DIY: Hemp Bracelets

Boho & Leather


For this Polyvore Inspired DIY, we will be making beaded hemp bracelets. You can use your clipboard from the last DIY or use some tape to secure your hemp cords. 
These bracelets look great alone or multiple stacked!

Wednesday, May 13, 2015

Polyvore Inspired DIY: Personalized Clipboard

90's hippie

90's hippie by glitteredwhimsy 

Hi there! I want to introduce another new post category, Polyvore Inspired DIYs! Today's DIY is a personalized clipboard that we will use later on as a securing board for friendship bracelets. Alternately, you could use a safety pin or tape to hold down the bracelet as you are working on it, but I found that a clipboard is handy because it keeps it secure, and you can use it on the go.
Let's get started!


Alright, first you need a clipboard. I have a mini clipboard from Office Depot. They are usually inexpensive and you can buy them most anywhere. You want to make sure the clip at the top goes straight across and is tight enough to hold a small amount of string. They make ones that have a bent metal wire instead of the large metal clip, but you want to get the one that has the most contact with the board, so your string doesn't slide out of place. 
Next, you want to gather your decorating materials. You can use washi tape, duct tape, stickers, paint, nail polish, mod podge, and whatever else you can think of, as long as it stays on the board and doesn't rub off after use. I probably wouldn't recommend pencils or crayons, because they tend to rub off and you don't want to stain your bracelets.
I'm going to be using mini duct tape in a rainbow tie dye pattern, some Lisa Frank animal stickers and a few stickers of some favorite characters.
First I'm going to add my tape in a diagonal pattern to block off where I want my stickers. Make sure to smooth it out all the way.
This is very cute on it's own and you could leave it at that, but to go with my 90's themed Polyvore set, I just HAVE to throw some Lisa Frank on there!
Look at those rainbow penguins. Beautiful. Now I have some extra room on there... Might as well fill it with some of my favorite characters that I just so happen to have stickers of.
Perfect! Now my board is complete. And I think it would go great with my outfit up there!
I know this DIY was super simple and you probably didn't need instructions on how to decorate a clipboard, but having a board like this makes making bracelets so much easier. And besides, now we are ready to go and make millions of friendship bracelets with our new personalized board! 
Bracelet making tutorials will be coming your way very soon. :)

Saturday, May 9, 2015

Last Minute Mother's Day Ideas


Tomorrow is Mother's Day!
If you haven't figured out what to get Mom yet, (and you're running out of time) how about giving her something hand made. Here are four tutorials for making your mom a bouquet that will never die. These tutorials vary in difficulty, but shouldn't be too hard to whip together by Mother's Day and made from something that you probably have lying around the house, paper!
I've pulled some paper flower tutorials from my Pinterest board:

Follow Victoria Klein's board Tissue Paper DIY on Pinterest.

Follow these links for DIY tutorials!

  1. Martha Stewart Weddings paper bouquet
  2. Paper Hyacinth from aunt peaches
  3. Paper Peonies from Brown Paper Packages
  4. 3 Different Paper Flowers from AttaGirl Says
Pair a bouquet of paper flowers with a nice handwritten card, and you'll be good to go!
Happy Mother's Day!